

That dull ache in your wrist may start quietly.. Its 3 PM, you’re deep in a project, and your wrists start to ache. Not a sharp pain at first—just a dull throb, maybe a little burning or tingling. You shake your hands out, flex your fingers, and get back to work. But by 5 PM, the ache has turned into something more worrying.
I’ve been there. And after spending years researching wrist pain typing ergonomics and testing solutions for myself and hundreds of readers, I can tell you this: you are not broken, and you don’t have to live with the pain.
The cause is almost always simple. When you type with bent wrists, you create constant friction on the tendons that pass through the carpal tunnel—a narrow passageway inside your wrist surrounded by bones and connective tissue. This friction causes inflammation, which can lead to conditions like tenosynovitis or carpal tunnel syndrome.
The good news? With the right ergonomic adjustments, you can fix this. Let’s dive into why typing hurts and exactly what to do about it.
What Causes Wrist Pain from Typing?
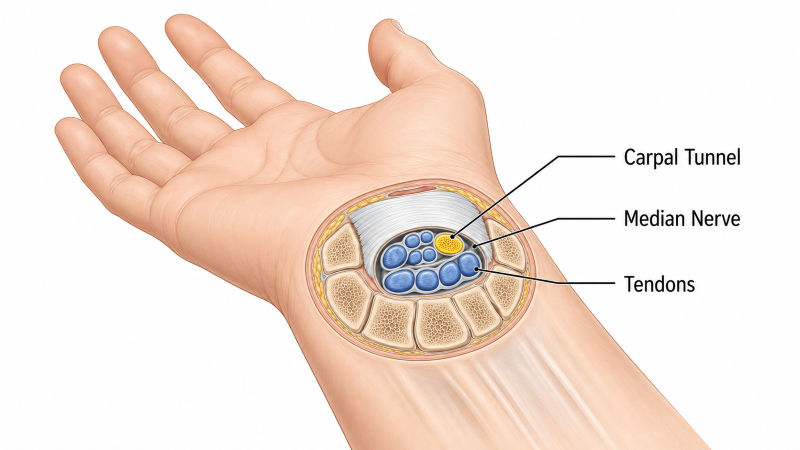
The anatomy of your wrist is incredibly complex. As Dr. Chia Wu, a hand orthopedic surgeon at Houston Methodist, puts it: “The hand and wrist are jam-packed with anatomy. It’s an area where there’s a different anatomical structure every few millimeters”
When you type with your wrists bent upward (extension) or downward (flexion), you force the tendons to rub against the bones and ligaments in your wrist. The Occupational Safety and Health Administration (OSHA) explains it clearly: “Bending the wrist while performing repetitive finger actions such as typing pulls the tendon over the bones and ligaments in the wrist. This creates irritation, inflammation, and eventually tendinitis or tenosynovitis”.
This constant strain can also compress the median nerve as it travels through the carpal tunnel, leading to the symptoms we associate with carpal tunnel syndrome.
The problem isn’t just bending your wrist for a few minutes. It’s the cumulative effect. As Dr. Wu explains: “Handling this extra tension isn’t an issue if it only lasts for 30 minutes or so, but if your wrist is undergoing this stress every day for eight hours a day, it really adds up”.
What takes your wrists out of a neutral position? Several factors:
– Your keyboard is too high, forcing your wrists to bend upward
– Your keyboard is a standard rectangle that forces your wrists to twist inward or outward to reach keys
– Your mouse requires you to twist your forearm into an unnatural palm-down position
– Your chair height is wrong, causing you to reach awkwardly for your keyboard
The key is understanding that these small angles even just 20 degrees of wrist bend can lead to overuse injury when repeated thousands of times a day .
Common Symptoms to Watch For
Carpal tunnel syndrome and other repetitive strain injuries don’t appear overnight. Symptoms start slowly and gradually worsen. Here’s what to watch for:
Numbness and tingling: Most often affects the thumb, index, middle, and ring fingers (but not the little finger). You might feel like your hand has “fallen asleep” or experience a feeling like an electric shock in these fingers.
Burning sensation or pain: The pain can radiate from your wrist up into your arm. Symptoms often worsen at night and may wake you from sleep.
Weakness: You might find yourself dropping objects or struggling with grip strength. This can be due to numbness or, in more advanced cases, weakness in the thumb’s pinching muscles.
The “shake-out” reflex: Many people instinctively shake their hands to try to relieve symptoms. This is a common sign of carpal tunnel syndrome.
When to see a specialist: Consultant Orthopedic Surgeon Mr. Alistair Hunter advises that if pain persists for a month, you should seek support from a specialist. Dr. Wu adds that “sensory-based symptoms beyond just pain—such as weakness, tingling or numbness—should also be a sign to be evaluated”* .
Don’t ignore the warning signs. Lasting nerve and muscle damage can occur without treatment.
The 5-Step Ergonomic Fix
Now for the part you’ve been waiting for: the actionable fixes. These five steps address the root causes of wrist pain typing ergonomics and can dramatically reduce or eliminate your symptoms.
Step 1: Adjust Your Keyboard Height
Your keyboard should be low enough that your wrists are not bending upward while you type. The correct height allows your elbows to be close to your body and bent at roughly a 90-degree angle.
How to test it: While typing, check if your wrists are angled. If your hands are higher than your forearms, your keyboard is too high. If your forearms slope upward, your keyboard is too low. The goal is a straight line from elbow to knuckles.
Pro tip: Many people use keyboard trays that slide under the desk. These allow you to position the keyboard slightly below desk level, which often achieves the perfect height.
Step 2: Maintain a Neutral Wrist Position
This is the single most important rule in wrist pain typing ergonomics: keep your wrists straight and in line with your forearms.
A neutral position means your thumb is in line with your forearm, with your wrist bent only slightly back—like when your arm hangs relaxed at your side.
What to avoid: Do not rest your wrists on a pad while you are actively typing. Wrist pads are designed for brief rests between typing sessions, not while you’re working. If you use a wrist pad, rest your palm or the heel of your hand on it, not your wrist.
The keyboard tilt trick: Many keyboards have feet that tilt the keys toward you. Consider flipping them so the keyboard is flat or even slightly tilted down at the front (away from you). This “reverse tilt” minimizes the need to keep your wrists flexed.
Step 3: Change Your Mouse
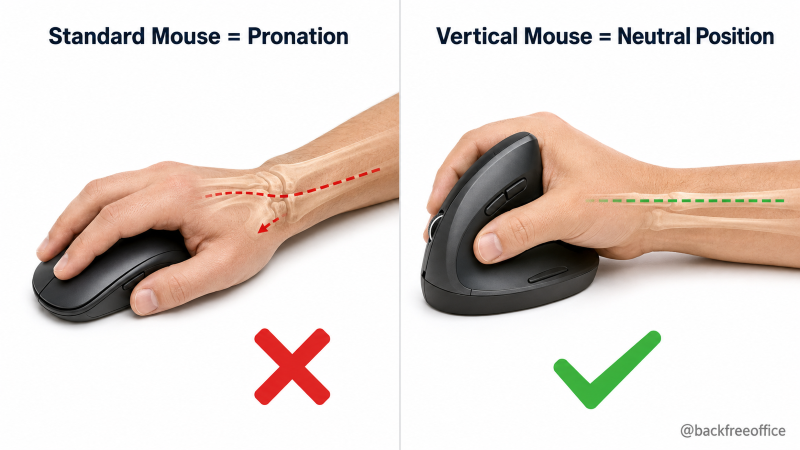
A standard mouse forces your arm into an unnatural twist called forearm pronation—your palm faces down, and your wrist bends to the side.
The solution? Switch to a vertical mouse. Vertical mice are designed so your hand rests in a natural handshake position, with your palm facing sideways rather than down. This keeps your wrist in a neutral posture and transfers movement to the more powerful shoulder muscles, reducing strain on the wrist.
Why vertical mice work:
– They encourage a neutral, relaxed working hand posture
– They reduce forearm twisting
– They help prevent repetitive strain injury (RSI) and carpal tunnel syndrome (CTS)
– They keep most of the underside of your wrist off the desk, reducing pressure in the carpal tunnel area
Bonus: Some vertical mice, like the Keychron M5, even include thumb scroll wheels that give your thumb an active role instead of letting it rest idly, further reducing the load on your fingers .
Step 4: Use Ergonomic Tools
If you’ve adjusted your height and switched to a vertical mouse but still experience pain, it’s time to upgrade your keyboard.
Ergonomic keyboards feature wider, angled typing beds that allow you to type without twisting your forearms or hunching your shoulders. Look for these features:
Split keyboards: These have two distinct halves, one for each hand. By positioning the two sides so they tilt away from each other, you reduce strain on your back and shoulders.
Tented keyboards: These have risers on the inner sides, tilting the center of the keyboard up like a tent. This allows you to type without twisting your wrists down to a flat surface .
Fixed split keyboards: A more approachable option, these create a small, static split between the two sides and tilt the keys outward so your hands approach from the sides, not the front .
Important note: Ergonomic keyboards come with an adjustment period. They can take days or even weeks to get used to, but the short-term inconvenience is worth it if you’re starting to feel pain. As one reviewer noted: “After making the change myself, I noticed I could work longer without the same tension in my hands and shoulders”.
Popular options include: Logitech Ergo K860 (split/tented), Goldtouch Adjustable Keyboard (fully adjustable), and Keychron’s ergonomic line.
Step 5: Take Frequent Breaks
You can have the most ergonomic setup in the world, but if you never move, you’ll still experience strain. The 2024 scoping review published in the Journal of Occupational Rehabilitation found that taking breaks and rest periods is one of the most effective strategies for preventing upper limb repetitive strain injuries.
Follow these rules:
The 20-20-20 rule: Every 20 minutes, look 20 feet away for 20 seconds. This gives your eyes a break too, and this doesn’t mean you now take your phone and scroll insta, beats the purpose of screen break doesn’t it?
The 30-minute stretch rule: Every 30 minutes, stand up, stretch your arms, and roll your wrists .
The “Stop, Break, Slow” method: If you feel pain, stop what you’re doing. Take a break. Slow down your movements when you resume .
Switch hands or positions: If possible, alternate tasks to give your dominant hand a rest .
Simple Wrist Stretches for Relief
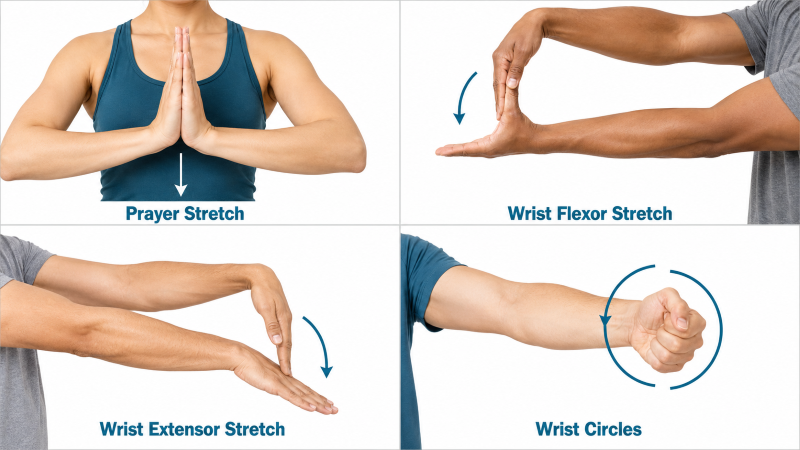
Stretching won’t fix a poorly set up workstation, but it can relieve tension and prevent further injury. Here are my go-to stretches for wrist pain relief exercises.
Stop if you feel sharp pain these should produce a gentle pull, not agony.
Wrist Circles
Extend one arm in front of you and rotate your wrist in slow circles—10 in each direction. Switch hands. This loosens up the joint and increases blood flow.
Prayer Stretch
Press your palms together in front of your chest, fingers pointing up. Slowly lower your hands toward your waist while keeping your palms pressed together. You should feel a stretch along the underside of your forearms. Hold for 15-30 seconds.
Wrist Flexor Stretch
Extend your right arm straight out, palm up. Use your left hand to gently pull your right fingers back toward you. Hold for 15-30 seconds. Switch hands.
Wrist Extensor Stretch
Extend your right arm straight out, palm down. Use your left hand to gently pull your right fingers down toward the floor. Hold for 15-30 seconds. Switch hands.
Wrist Extension with Resistance (Strengthening)
Hold your wrist joint straight while gently applying force to the top of your hand or your palm, resisting the pressure from your other hand. A 2024 study from the NIH found that grip-strengthening exercises combined with wrist stability training significantly improved pain, function, grip strength, and muscle strength in patients with chronic wrist pain.
Who Should Consider a Specialist?
Ergonomic adjustments and stretches work for most people. But sometimes, you need professional help.
See a doctor or physical therapist if:
-Pain persists after 1-2 weeks of ergonomic adjustments
-You experience constant numbness or weakness
– Symptoms interfere with daily activities (sleeping, driving, holding objects)
– You notice muscle wasting in the hand or thumb
As one expert put it: “Pain is a defense mechanism. It’s telling you there’s something wrong with your body. If your hand or wrist pain is not going away, seek medical evaluation” .
Dr. Wu adds: “It’s very common for desk work to lead to an overuse injury, but prolonged wrist pain is too subtle an issue to tease out yourself at home. It could be an overuse injury superimposed on top of an underlying injury”.
What to expect: Your doctor may recommend a wrist brace (especially at night), physical therapy, or in some cases, a corticosteroid injection. In severe cases, surgery may be considered. But most people respond well to conservative treatment.
Frequently Asked Questions
Is typing a common cause of carpal tunnel syndrome?
Typing with bent wrists can predispose you to carpal tunnel syndrome over time, but it’s not the only cause. Health conditions, repeated hand motions, and wrist structure also play a part. The key is maintaining a neutral wrist position to reduce stress on the median nerve.
Are ergonomic keyboards actually worth it?
Yes, especially if you’re experiencing pain. A 2024 scoping review found that using ergonomic equipment is the most prevalent approach for preventing upper limb repetitive strain injuries . While not a magic bullet, ergonomic keyboards reduce muscle strain and can make extended computer use more comfortable.
Can wrist stretches prevent injury?
Stretches alone are not a substitute for proper ergonomics, but they are an effective supplement. A 2024 NIH study showed that grip-strengthening exercises combined with wrist stability training significantly improved pain and function in patients with chronic wrist pain.
What’s the best ergonomic mouse for wrist pain?
Vertical mice are consistently recommended because they keep your hand in a neutral handshake position, reducing forearm pronation and strain on the wrist. Brands like Logitech, Keychron, and Posturite offer popular models.
Your 7-Day Challenge
You’ve read the science. You know the fixes. Now it’s time to take action.
Here’s your 7-day challenge:
- Day 1: Adjust your keyboard height and check your wrist position.
- Day 2: Order a vertical mouse (I recommend starting with a budget-friendly option).
- Day 3: Set a timer on your phone for 30-minute stretch breaks.
- Day 4: Try the prayer stretch and wrist circles during a break.
- Day 5: Evaluate if you need an ergonomic keyboard.
- Day 6: Make any final adjustments to your desk setup.
- Day 7: Assess your progress—is your wrist pain improving?
What to do if you feel no improvement: If after two weeks of consistent ergonomic adjustments you still experience pain, see a doctor. Prolonged wrist pain is too subtle an issue to tease out yourself at home.
Your wrists are your most valuable tools. Protect them now, and you’ll be typing pain-free for decades to come.
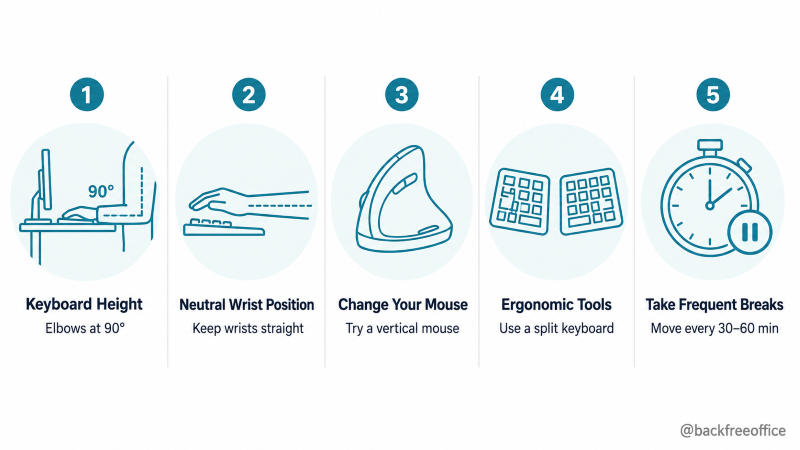
Key Takeaway Box
| Problem | The Fix |
|————-|————-|
| Bent wrists while typing | Keep wrists straight and in line with forearms (neutral position) |
| Keyboard too high | Adjust to elbow height (90-degree angle) |
| Standard mouse causes forearm twist | Switch to a vertical mouse (handshake position) |
| Traditional keyboard forces unnatural posture | Use a split or tented ergonomic keyboard |
| No movement breaks | Take 30-second breaks every 30 minutes |
| Ignoring symptoms | See a doctor if pain persists after 1-2 weeks |
Try these fixes for one week. Set a timer on your phone right now to remind you to stretch every 30 minutes. And if your pain starts to fade—or if you discover a trick that worked for you that I didn’t mention—drop a comment below. Your experience might help someone else who’s still searching for relief.