
An ergonomic desk setup is an arrangement of your chair, desk, monitor, keyboard and mouse designed to keep your body in a neutral, low-strain position throughout the workday. The goal is not to hold one “perfect” pose for eight hours. It is to make your usual working positions easier, reduce unnecessary reaching and bending, and give yourself regular opportunities to move.
Small adjustments often matter more than expensive equipment. Start with the chair, then set the desk and input devices around your body, and finish with the screen. This guide walks you through that sequence so you can build a practical ergonomic desk setup for long hours of computer work.
There Is No Single Correct Posture
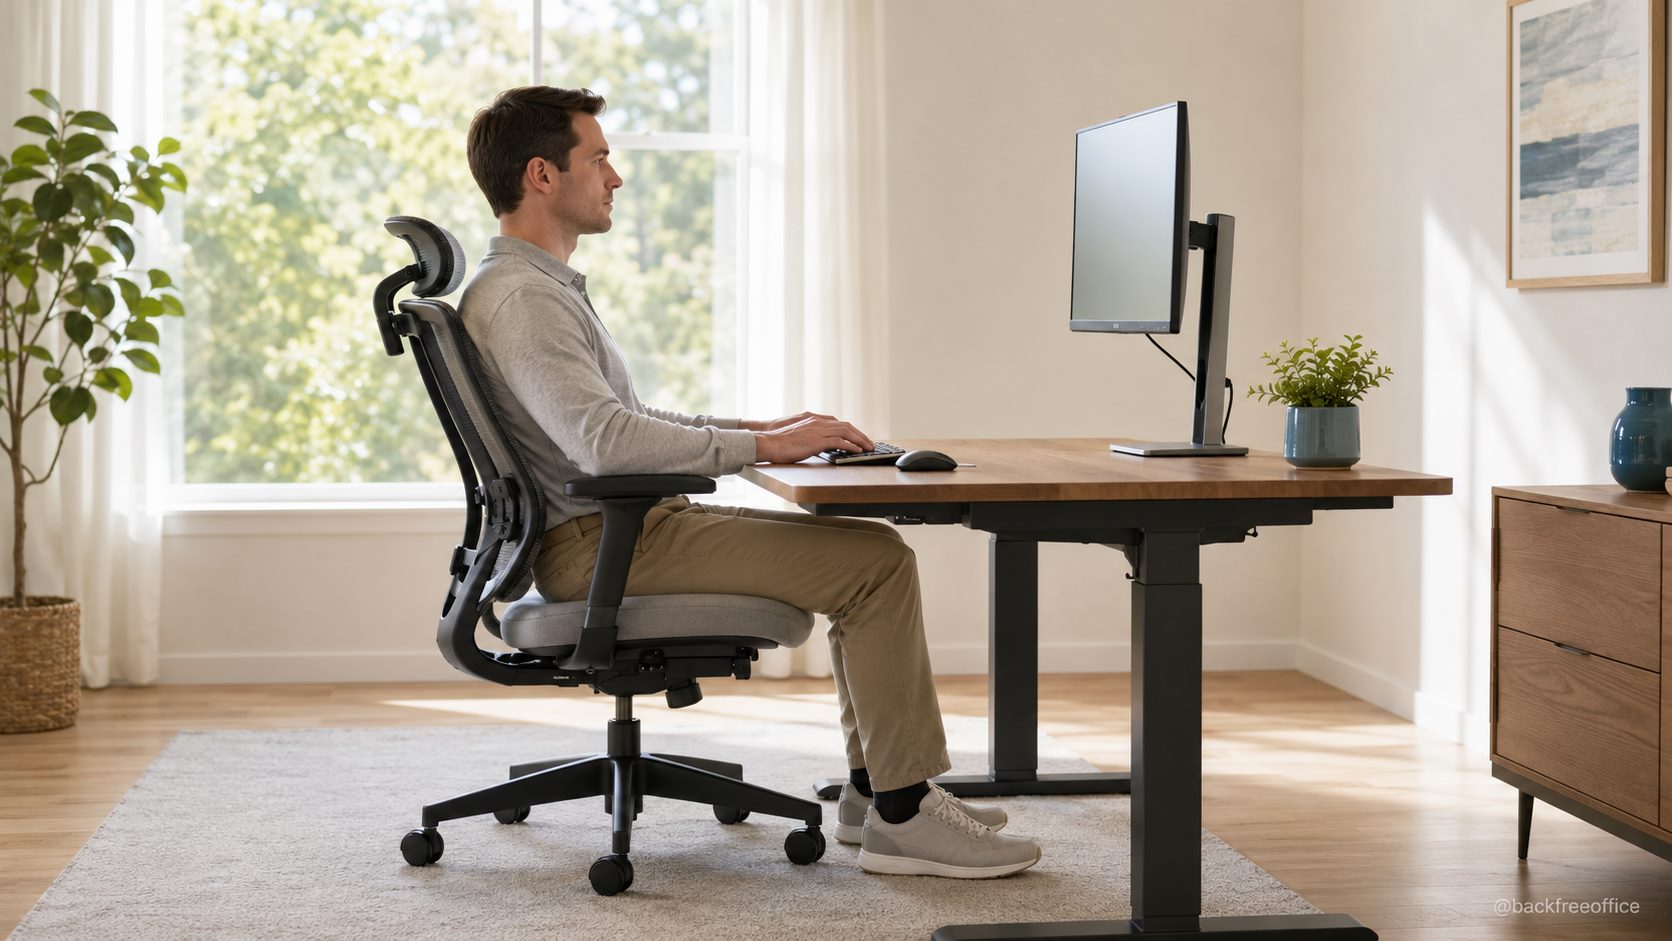
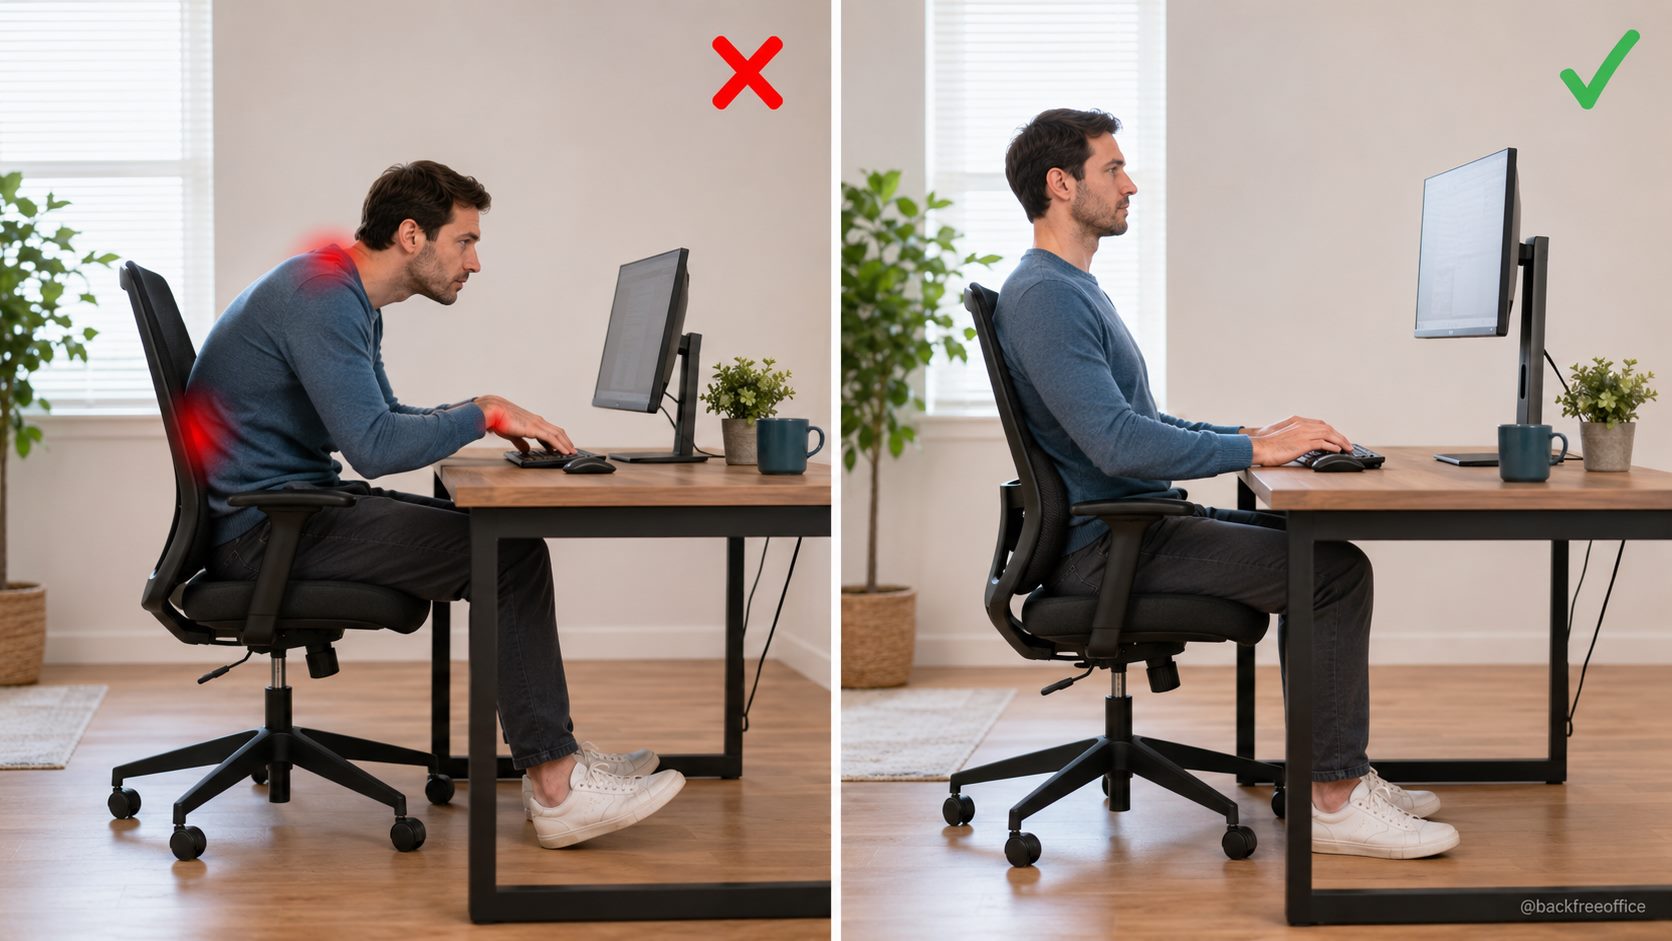
A neutral posture is a useful starting point: your head is balanced over your shoulders, your shoulders are relaxed, your elbows stay close to your sides, and your wrists follow the line of your forearms. Your feet should feel supported, and the backrest should support your lower back. However, even a well-aligned position can become uncomfortable when you stay still too long.
The best setup therefore gives you more than one comfortable position. You might sit upright for focused typing, recline slightly while reading, stand for a short call, and take a brief walk between tasks. The OSHA computer workstation guidance recommends changing working positions frequently and making small adjustments to the chair or backrest. Think “supported and changeable,” not rigid.
1. Adjust Your Chair First
Your chair sets the height and position of your whole body. If you adjust the monitor or keyboard first, you may have to undo those changes later.
Set the seat height
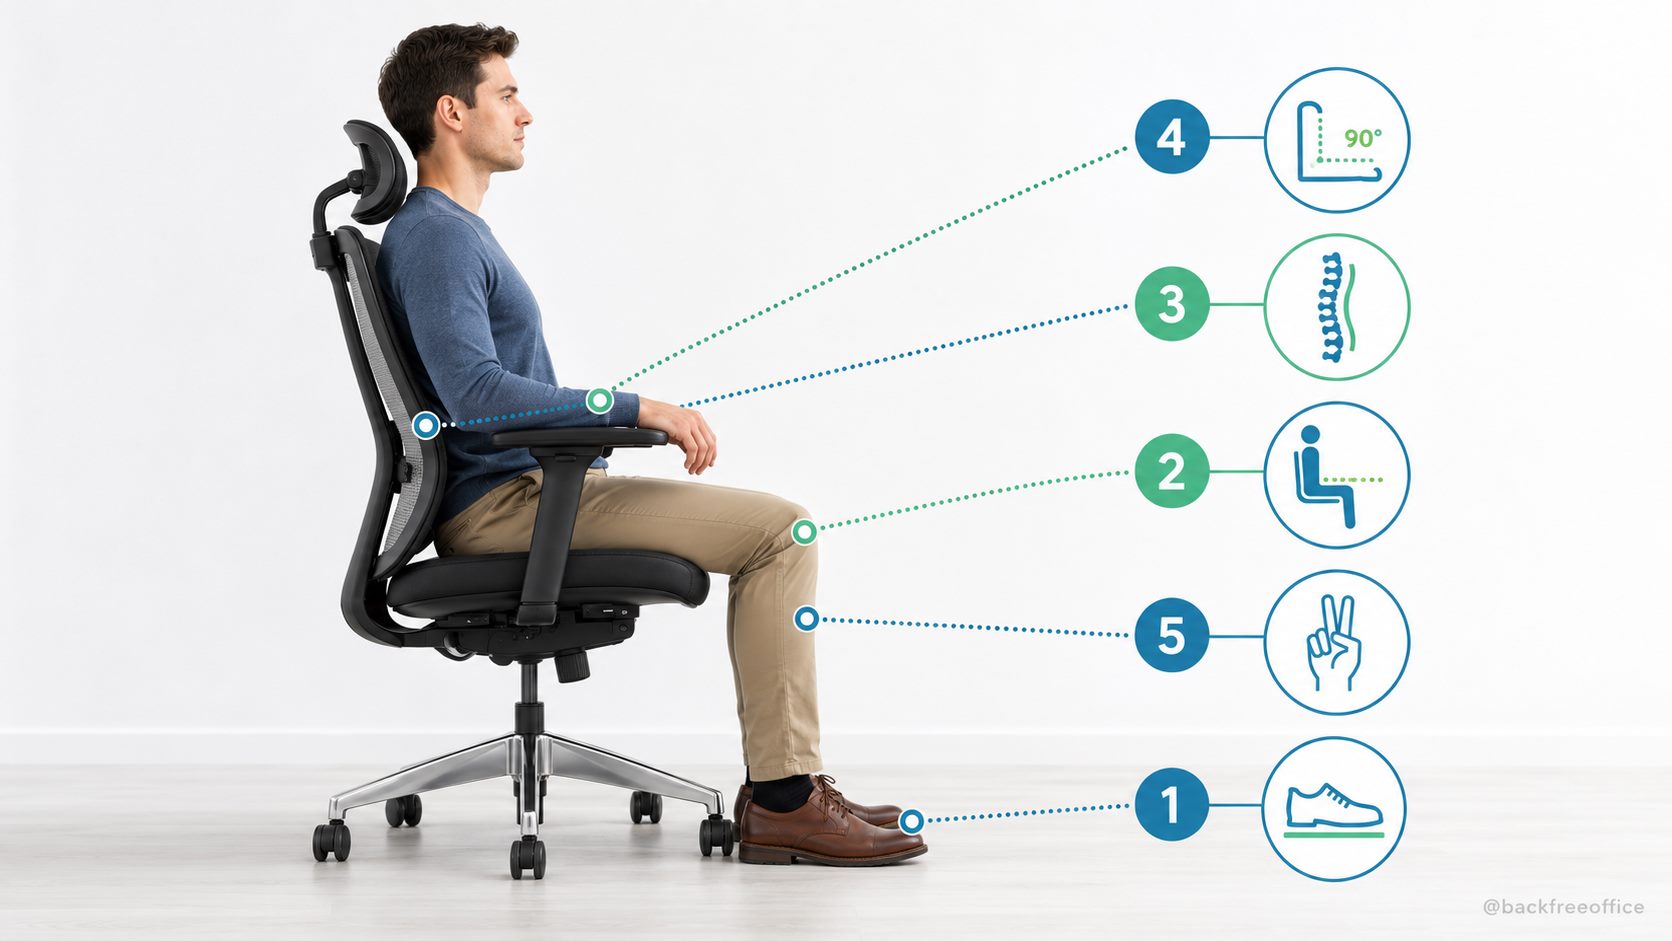
Raise or lower the chair until your feet rest flat on the floor and your thighs are roughly parallel to it. Your knees should be around hip height, with no hard pressure at the back of the thighs. If the desk forces you to raise the chair and your feet no longer reach the floor comfortably, add a stable footrest.
Support your lower back
Sit fully back rather than perching on the front edge. Adjust the lumbar support so it meets the natural inward curve of your lower back. A chair’s built-in support is often enough when it is positioned correctly. If it is not, a small cushion can help; our guide to the best lumbar support cushions for office chairs explains what to look for.
Leave space behind the knees
There should be a small gap—roughly two or three fingers—between the seat edge and the back of your knees. A seat that is too deep can pull you away from the backrest; one that is too shallow may not support enough of your thighs.
Use armrests lightly
Set armrests low enough that your shoulders remain relaxed and high enough to support your forearms during pauses. If they prevent you from getting close to the desk, lower or remove them. For more troubleshooting, see why an office chair may hurt your back. OSHA’s detailed chair checklist is also useful when evaluating adjustments or a replacement.
2. Fit the Desk to Your Seated Position
Once the chair feels supportive, bring the desk and equipment to you. The working surface should allow your elbows to stay close to your body with your forearms approximately parallel to the floor. Your shoulders should not need to lift to reach the keyboard.
Clear enough space under the desk for your knees, thighs and feet. Storage boxes, computer towers and drawers can quietly force you to twist or sit farther away. OSHA’s desk guidance stresses adequate clearance and enough surface depth to place the monitor at a comfortable distance.
If a fixed desk is too high, raise the chair and use a footrest. If it is too low, consider stable desk risers rather than hunching. Keep frequently used items—phone, notebook and water—within easy reach. Less-used objects can sit farther away and become a reason to stand.
3. Position the Keyboard and Mouse as One Unit
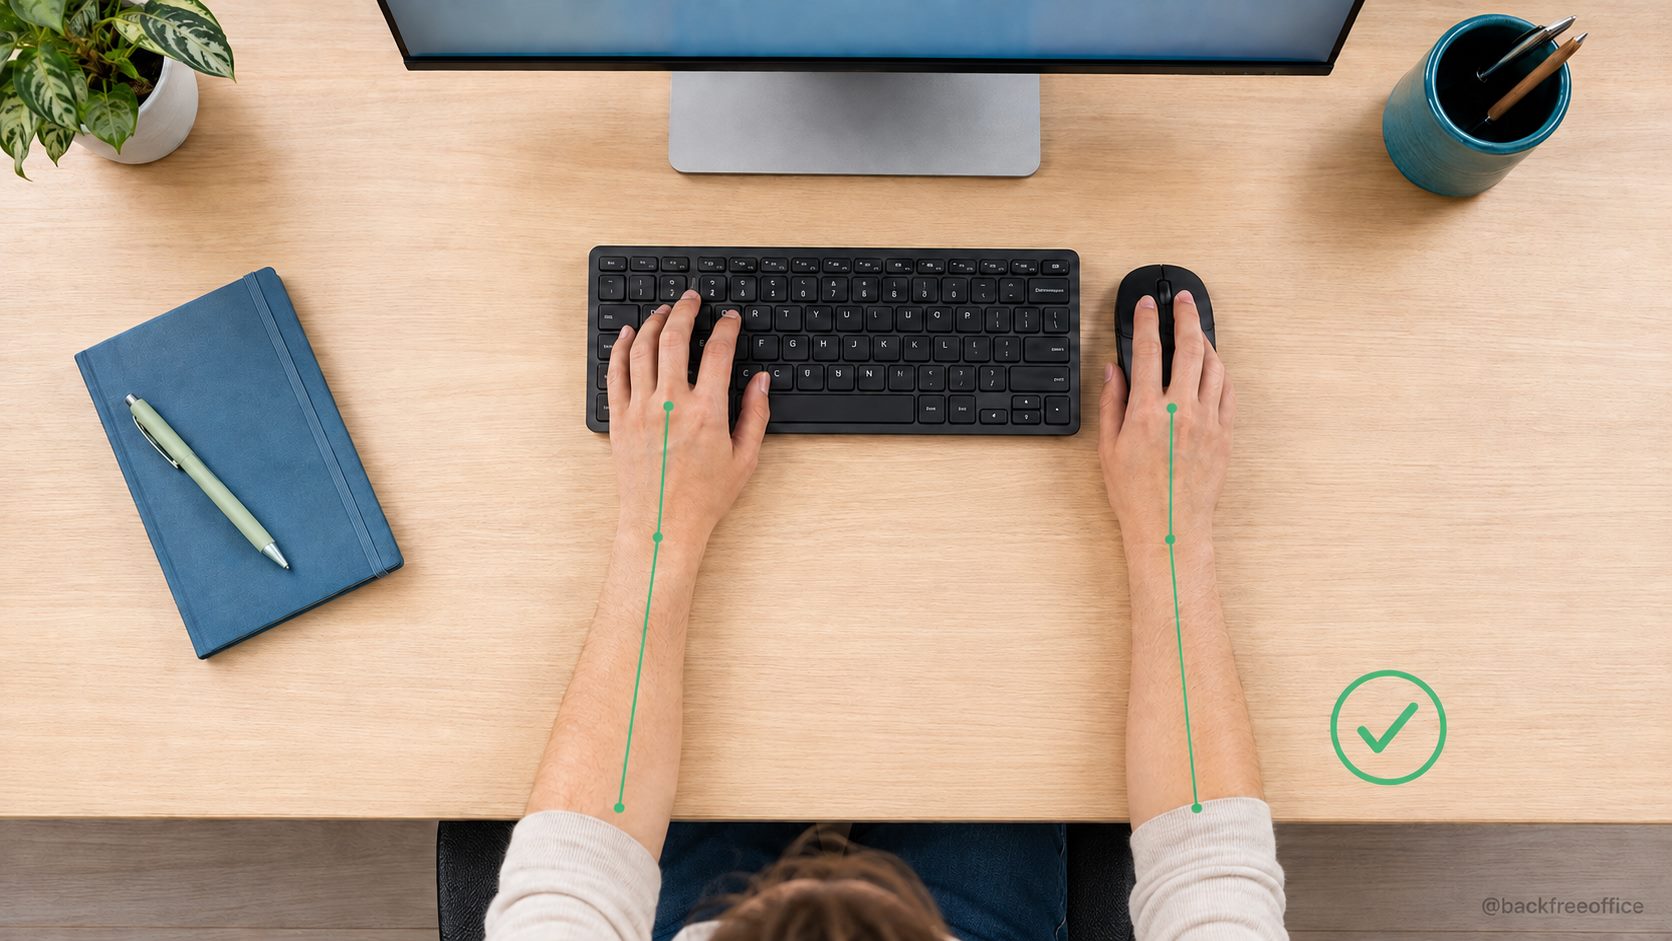
Place the keyboard directly in front of you, close enough that your elbows stay near your torso. Your wrists should remain straight rather than bent up, down or sideways. A slight negative keyboard tilt can be comfortable for some people, but the priority is a straight forearm-to-hand line.
Keep the mouse beside the keyboard at the same height. If it sits far to the side, your shoulder must repeatedly reach forward or outward. Increase pointer speed if that lets you move the cursor with smaller movements, and use keyboard shortcuts to reduce repetitive clicking.
A wrist rest is best used during pauses, supporting the heel or palm of the hand—not pressing into the wrist while you type. If discomfort is already appearing, read why your wrists hurt when typing and our guide to hand pain from typing. The official OSHA pages on keyboard placement and pointer and mouse setup provide additional checks.
Get the Free Desk Checklist
Want a quick way to check every part of your workstation? Get the free five-minute ergonomic desk setup checklist by email.
4. Set the Monitor Height and Distance
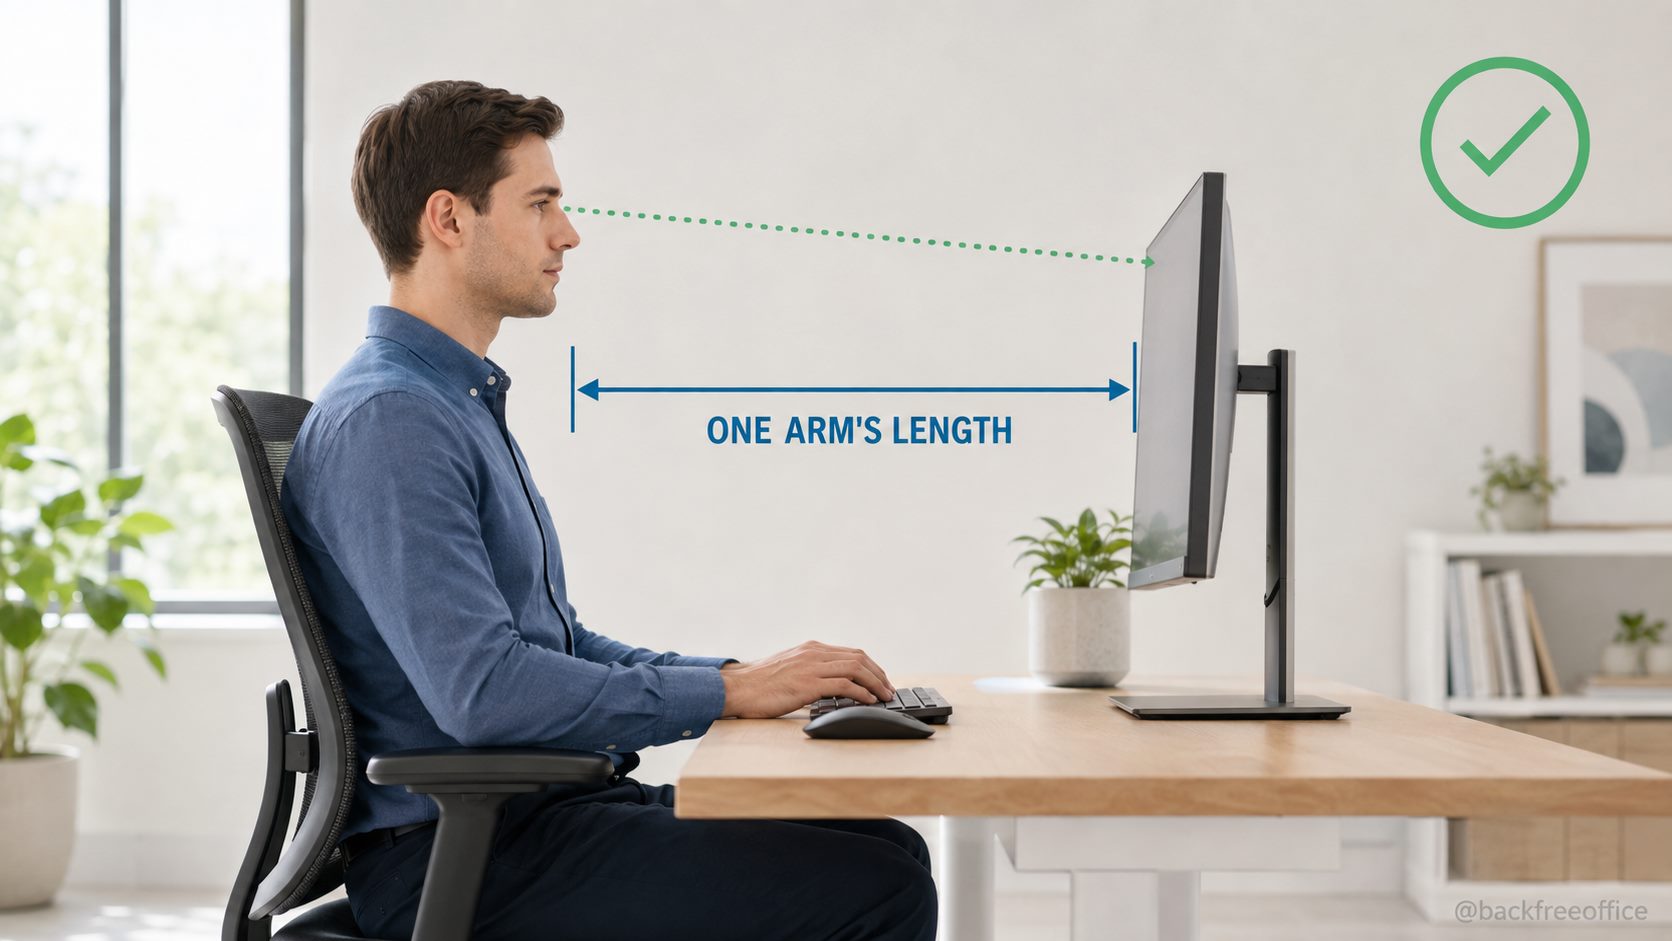
Center your primary monitor in front of you so you do not spend hours with your neck rotated. A practical starting point is to place the top of the screen at or slightly below eye level. When you look straight ahead, your eyes should naturally land near the upper portion of the display, allowing a small downward gaze.
Set the screen about an arm’s length away, then adjust for your vision and text size. Bring the display closer or increase zoom before leaning your head toward it. Tilt the screen slightly to keep it perpendicular to your line of sight and reduce glare from windows or overhead lights.
If you wear bifocals or progressive lenses, a slightly lower monitor may prevent you from tipping your head back. For a fast check, use our one-second monitor-height test. OSHA’s monitor guidance covers screen distance, angle and multiple-monitor arrangements.
5. Make a Laptop Setup Work for Longer Sessions
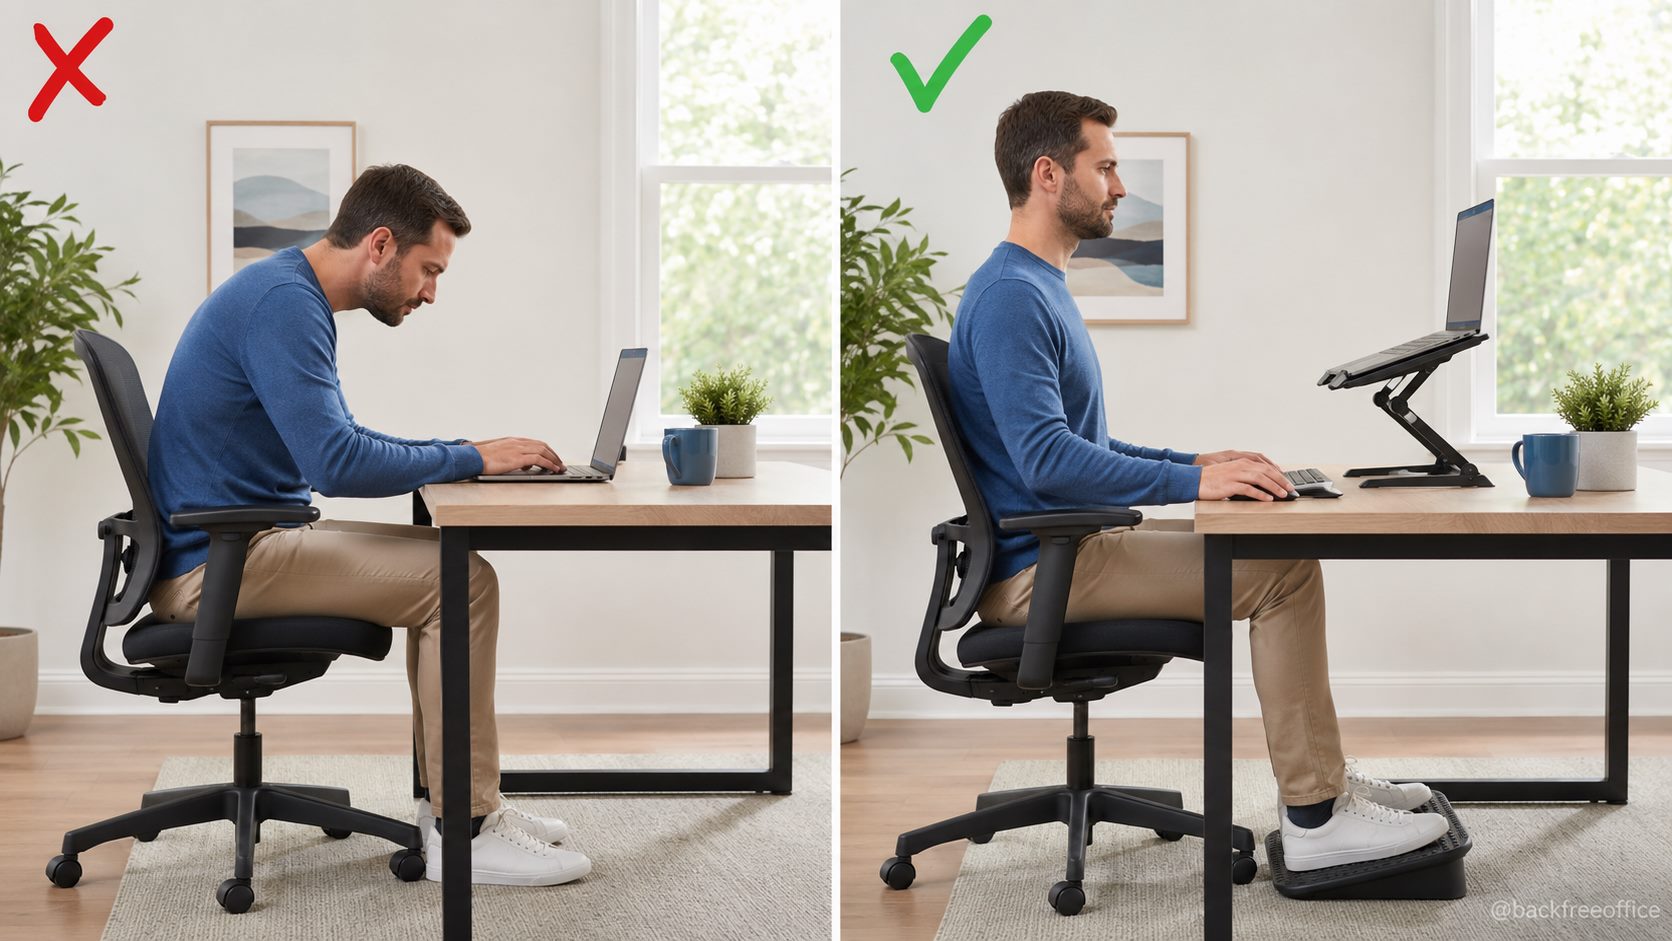
A laptop joins the screen and keyboard together, so it is difficult to position both correctly at the same time. When the keyboard is at elbow height, the screen is usually too low; when the screen is raised, the built-in keyboard becomes too high.
For longer sessions, place the laptop on a stable stand or stack of books and connect an external keyboard and mouse. Set the top of the screen near eye level and arrange the input devices using the same rules as a desktop workstation. If you cannot carry accessories, change position often and reserve the unsupported setup for shorter tasks.
6. Use a Sit-Stand Desk as a Positioning Tool
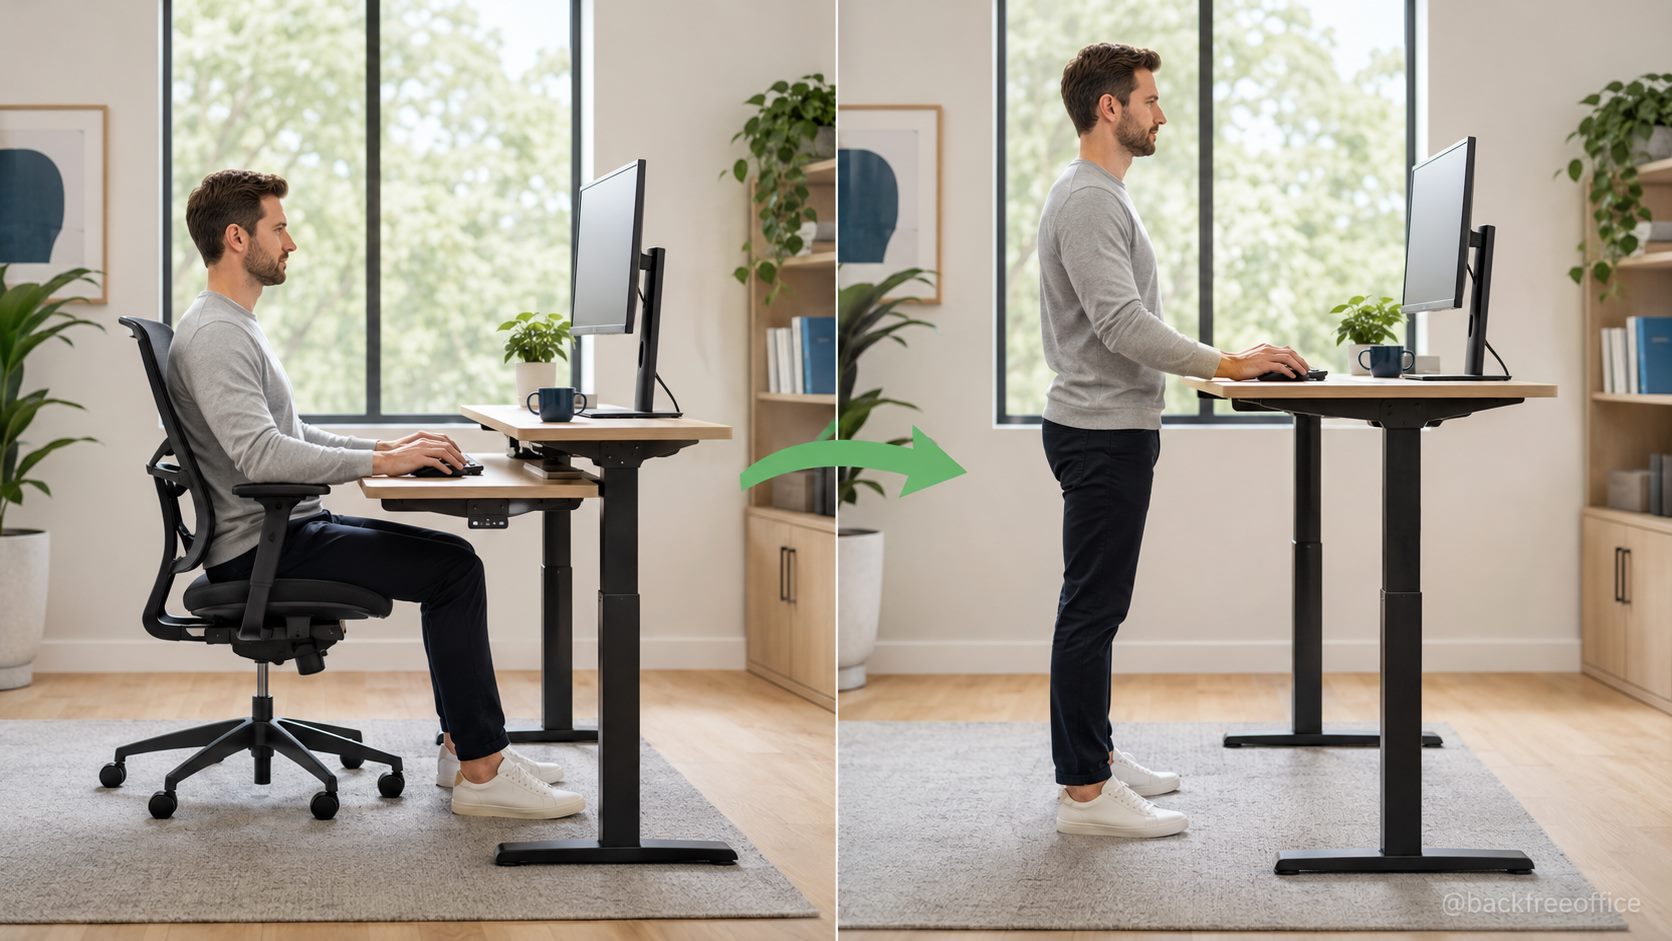
A sit-stand desk can add variety, but standing all day is not the goal. Alternate gradually and listen to early signs of fatigue. When standing, keep the keyboard near elbow height, shoulders relaxed and monitor at the same eye-level relationship used while sitting. Avoid locking your knees or leaning on one hip for long periods.
Start with short standing blocks—perhaps during calls or routine email—and return to sitting before you feel tired. Comfortable shoes and a footrest or low rail can help you vary your stance. Our comparison of a standing desk versus a sitting desk explains why switching positions generally matters more than choosing one mode exclusively.
7. Add Movement, Lighting and Work Habits
Equipment cannot replace movement. Break long tasks into shorter blocks and use natural transitions—finishing an email batch, joining a call or refilling water—as cues to change position. OSHA’s work-process recommendations encourage brief rest pauses, stretching and alternating computer tasks with other work.
Reduce screen glare by placing the monitor at a right angle to windows when possible. Adjust blinds, use task lighting for paper documents, and keep the screen clean. Increase font size so you can read without craning forward. A document holder beside the monitor can also reduce repeated head movement when you type from notes.
Try short, frequent movement instead of relying on one long stretch session. These desk stretches you can do without standing are a simple place to begin. The Mayo Clinic office ergonomics guide offers a clear visual overview of chair, footrest, desk and monitor positioning.
Key Takeaway: Build From the Body Outward
The simplest order is chair, feet, desk, keyboard and mouse, then monitor. Each part should support a relaxed neutral position without forcing you to reach, twist or lean. After that, make movement part of the setup itself.
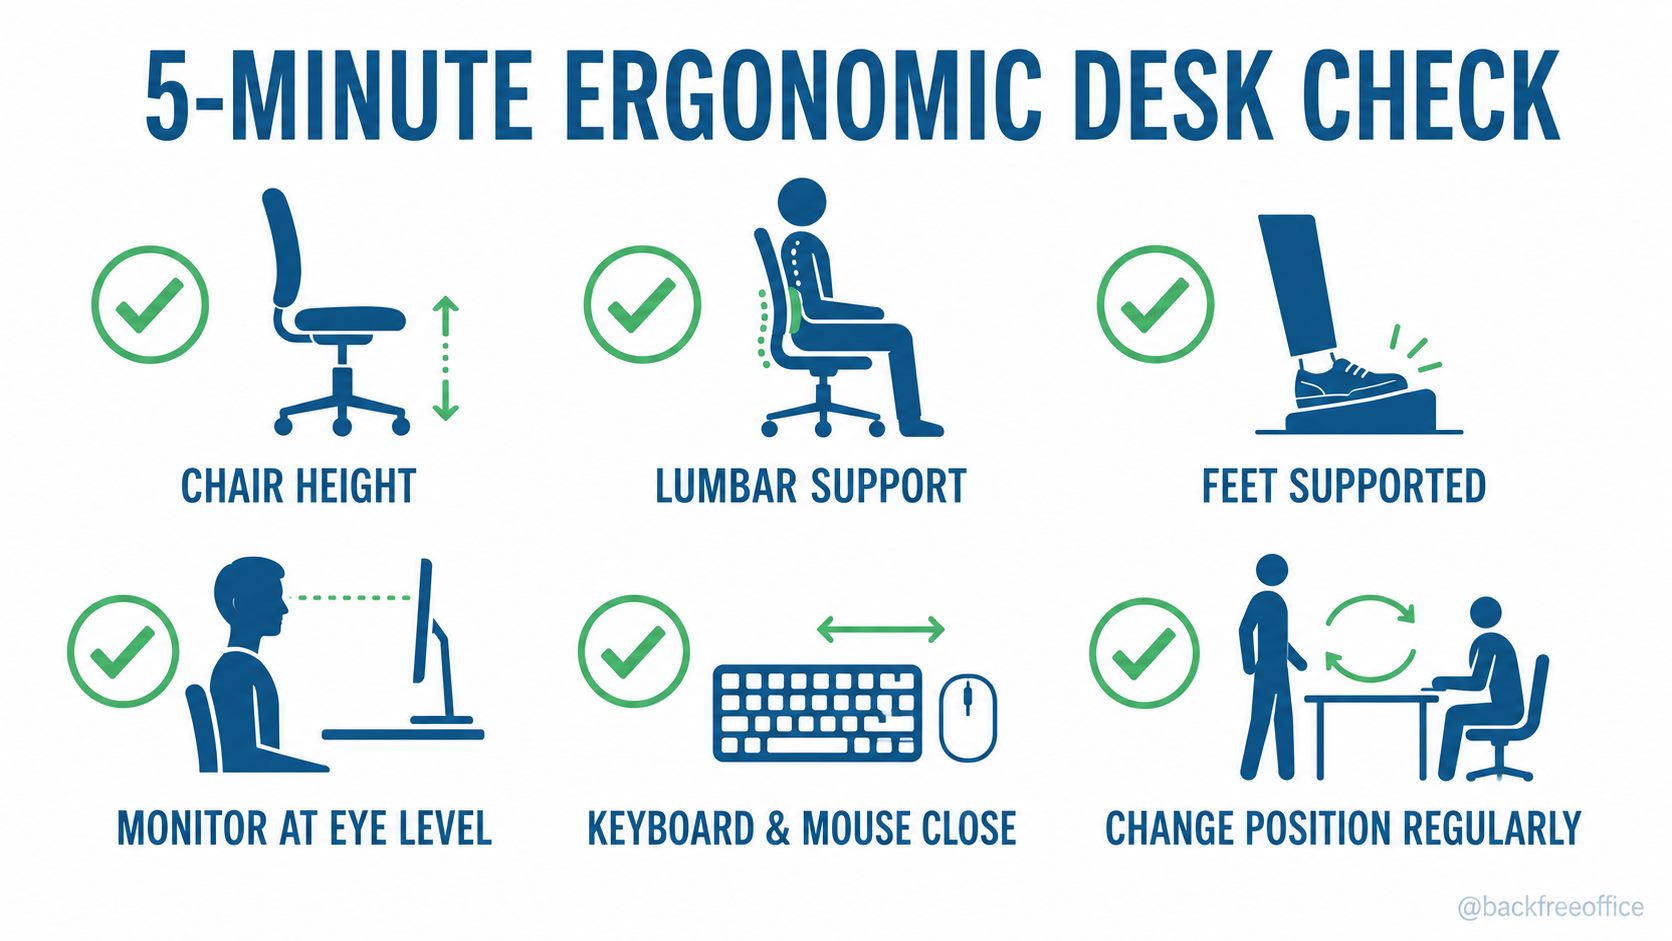
Use our complete ergonomic desk setup checklist to audit the details. Change one or two things at a time, work normally for a day, and note what improves. If pain is severe, persistent, follows an injury, or includes numbness or weakness, seek advice from a qualified healthcare professional.
Frequently Asked Questions
What is the best ergonomic desk setup?
The best ergonomic desk setup supports your feet, lower back and forearms while keeping the monitor in front of you and the keyboard and mouse close together. It also lets you change position regularly. Exact measurements vary with body size, vision, equipment and the tasks you perform.
How high should my desk be for typing?
The keyboard surface should let you type with relaxed shoulders, elbows near your sides and wrists aligned with your forearms. If a fixed desk is too high, raise the chair and support your feet. If it is too low, use stable risers or an adjustable surface.
Should my monitor be at eye level?
A good starting point is for the top of the visible screen to sit at or slightly below eye level, with the display roughly an arm’s length away. Adjust it for your vision, screen size and eyewear. The key is reading comfortably without bending your neck or leaning forward.
Are standing desks better than sitting desks?
Neither position is ideal for an entire day. A standing desk is most useful because it makes changing position easier. Alternate between supported sitting, comfortable standing and brief movement rather than trying to replace all sitting with standing.
How often should I take a break from my desk?
There is no single interval that suits every person or job. Take brief, regular opportunities to look away, move and change posture, especially when a task is repetitive or highly focused. Natural work transitions make reliable reminders, and short breaks are easier to sustain than occasional long ones.
Try a One-Week Ergonomic Desk Audit
For the next seven working days, spend five minutes checking one part of your setup: chair on day one, desk clearance on day two, keyboard and mouse on day three, monitor on day four, laptop or standing mode on day five, and movement habits on the remaining days. Photograph or note your starting position so small improvements are easy to see.
Do not redesign everything at once. Keep the changes that make work feel easier and reverse the ones that do not. A good ergonomic desk setup is not a showroom arrangement—it is a workstation that fits your body, your tasks and the way you actually work.
Make the Audit Easy
Get the free five-minute desk checklist and keep the complete setup sequence in your inbox.